|
User Manual for WALRUS AUDIO Descent Reverb and Octave Machine Pedal Click to enlarge the picture
 Contents of the user manual for the WALRUS AUDIO Descent Reverb and Octave
- Product category: Effects Pedals WALRUS AUDIO
- Brand: WALRUS AUDIO
- Description and content of package
- Technical information and basic settings
- Frequently asked questions – FAQ
- Troubleshooting (does not switch on, does not respond, error message, what do I do if...)
- Authorized service for WALRUS AUDIO Effects Pedals


 |
User manual for the WALRUS AUDIO Descent Reverb and Octave contain basic instructions
that need to be followed during installation and operation.
Before starting your appliance, the user manual should be read through carefully.
Follow all the safety instructions and warnings, and be guided by the given recommendations.
User manual is an integral part of any WALRUS AUDIO product,
and if it is sold or transferred, they should be handed over jointly with the product.
Following the instructions for use is an essential prerequisite for protecting
health and property during use, as well as recognition of liability on the part of the manufacturer
for possible defects should you make a warranty claim. Download an official WALRUS AUDIO user manual in which you will find instructions on how to install, use, maintain and service your product.
And do not forget – unsuitable use of a WALRUS AUDIO product will considerably shorten its lifespan!
|
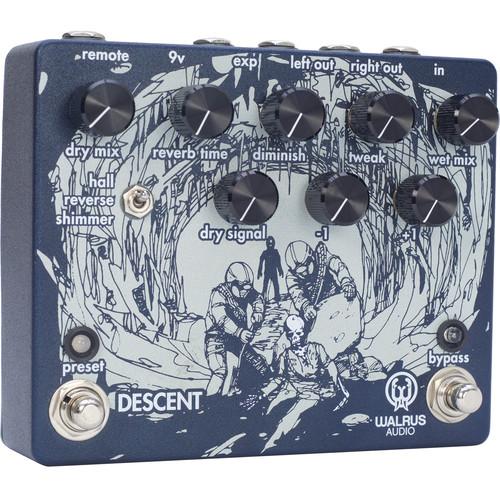
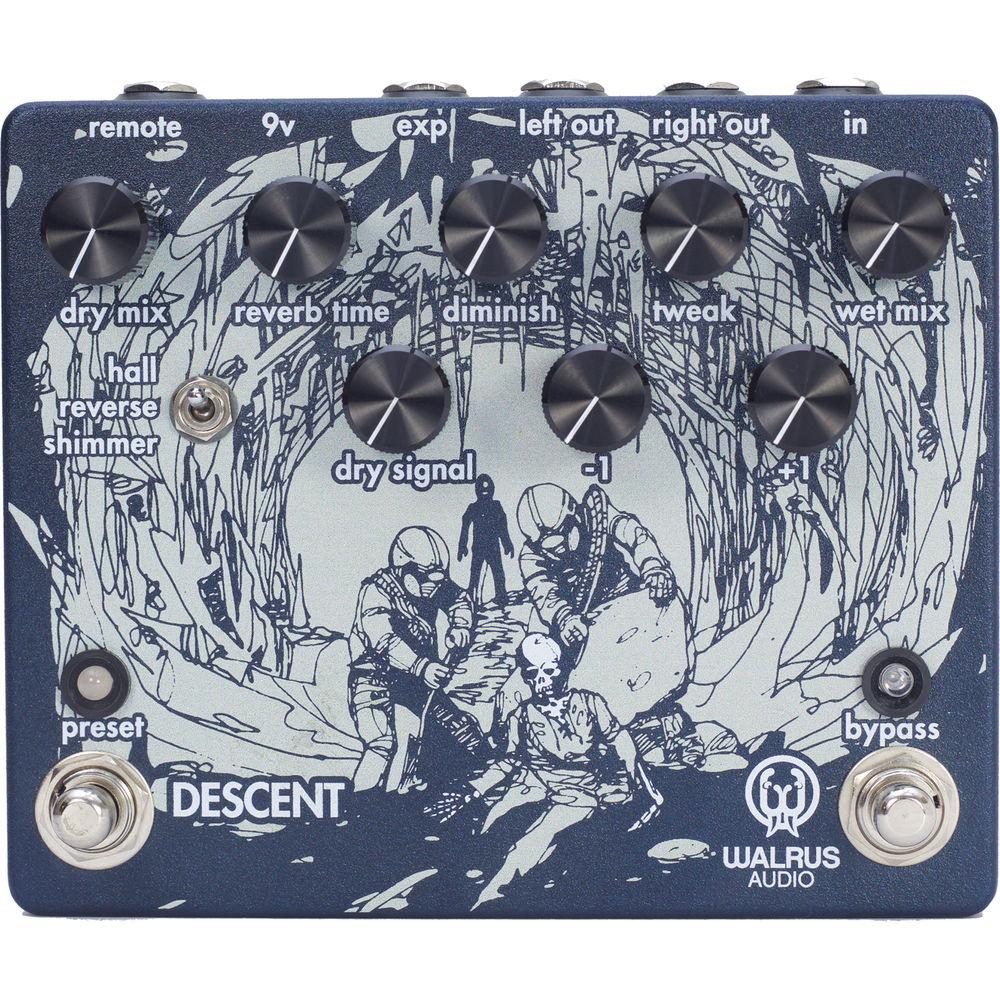
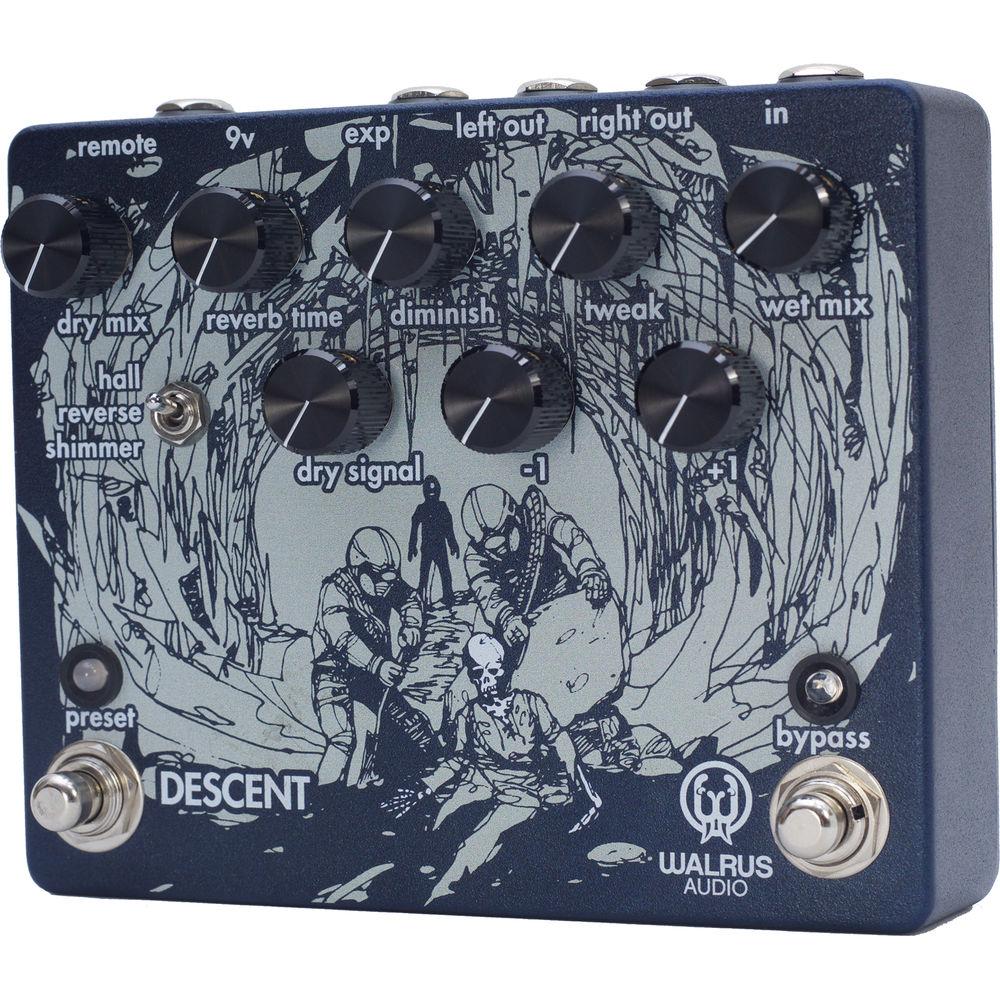
Product description The Walrus Audio Descent is a reverb pedal with octave capabilities designed for guitarists, keyboardists, and other instrumentalists with suitable connections. With three different modes at your disposal, you can use this pedal to create a variety of sonic landscapes and textures. The texture switch allows you to select among operation modes like hall, reverse, and shimmer. The controls of the pedal vary to some degree depending on the selected mode, though you will find consistency in how you can dial in sub-octave and octave-up signal into your reverberated tone.By default, the pedal accepts mono signal and can either output in mono or stereo. However, by means of an internal DIP switch, you can flip the Descent into stereo-input mode, which turns the stompbox into a 2-in/2-out device. Please note you’ll need a TRS splitter cable to route your stereo signal into this pedal for this usage. An expression input lets you use your favorite expression pedal to swell various controls in the pedal; for information on how to set up an expression pedal, please peruse the features. A remote input provides an increase in functionality, as it lets you put the Descent in the back of your pedalboard and use a remote pedal to toggle the preset cycle and bypass footswitches. The remote pedal is available separately, as is the 9 VDC power supply needed to power the unit.The Descent utilizes true bypass circuitry to ensure your pedal is pristine and unprocessed in its bypassed state. As indicated by the preset footswitch, you can save three presets into the pedal and cycle through them with this footswitch. For more information on how to store presets, as well as a comprehensive breakdown on how the controls change depending on the mode selected, please read the features section. Controls at a Glance - Hall Mode
- Dry Mix: This knob dictates how much of the instrument volume is running through the effect. Set it to zero to hear only the processed signal; set it to full to bring in your instrument signal.Reverb Time: This will control the time length of your processed signal. Set it to zero for no effect; set it to full to add a long trail to your signal. Diminish: This control sets your reverb diffusion. Turn it clockwise to get a more diffuse reverb signal. Reverb mimics the size of a room, but diffusion mimics the walls of this room more specifically. Set this control to zero to approximate a rough or rocky wall sound.Tweak: Here you control your reverb damping. Turn it clockwise to lower the threshold of higher frequencies introduced into the reverberated signal.-1 Octave: This controls the level of signal automatically sounding one octave below the note you are playing. Set it to zero for no contribution from this octave generator; set to full for maximum sub-octave reverberation.+1 Octave: This controls the level of signal automatically sounding one octave above the note you are playing. Set it to zero for no contribution from this octave generator; set to full for maximum octave-up reverberation.Dry Signal: Your instrument signal is running through the two octave controls. This knob controls how much of the pure instrument tone is heading to the top row reverb controls. At zero, your octave signal is only sent to the top reverb controls. Set it all the way up and all of your dry signal goes to the top reverb controls, along with whatever extra octaves you have set.Wet Mix: This mixes your ratio between how much dry signal and how much wet signal is in your output. Set it to 12 o'clock, you will hear 50% dry and 50% wet. Turn it clockwise to hear less dry signal and more wet, and turn it counter-clockwise to hear more of your instrument without the processed signal.
- Reverse Mode
- Dry Mix: This knob dictates how much of the instrument volume is running through the effect. Set it to zero to hear only the processed signal; set it to full to bring in your dry instrument signal.Reverb Time: In Reverse Mode, this is your pre-delay controller. Set it to zero for a quick return and turn clockwise to delay your reversed return signal.Diminish: In Reverse mode, this will act as your reverb time, and will control how long your signal draws out. Set it to zero for no effect; set it to full for a long trail to your signal. Note that your pre-delay and your reverb time are playing off of each other in the Reverse mode. The Pre-delay captures an echo, and then the reverb time—controlled by Diminish control—allows you to choose how much reverb goes on to that captured echo.Tweak: This controls your signal’s tone. To get a dark, warm tone, set this control to zero; to get a brighter, more chime-like tone, set this knob to full. Your tone will move from dim to bright as you move the control clockwise.Dry Signal: In reverse mode, this knob controls how much unprocessed instrument signal is routed to the top row reverb controls. At zero, only your octavized signal will send to the top reverb controls. At maximum, 100% of your dry signal goes to the top reverb controls alongside your dialed-in octavized setting.-1 Octave: This controls the level of signal automatically sounding one octave below the note you are playing. Set it to zero for no contribution from this octave generator; set to full for maximum sub-octave reverberation.+1 Octave: This controls the level of signal automatically sounding one octave above the note you are playing. Set it to zero for no contribution from this octave generator; set to full for maximum octave-up reverberation.Wet Mix: This control mixes your ratio between how much dry signal and how much wet signal is in your output. Set to 12:00, you will get 50% dry and 50% Wet. Turn clockwise to get less dry and more wet, turn counter-clockwise to hear more of your instrument without the effected signal.
- Shimmer Mode
- Dry Mix: This knob dictates how much of the instrument volume is running through the effect. Set it to zero to hear only the processed signal; set it to full to bring in your dry instrument signal.Reverb Time Knob: In shimmer mode, this knob acts as your reverb time. This will control how long your signal draws out. Set it to zero for no effect; set it to full to add a long trail to your signal.Diminish: This will control your reverb feedback, or how many times your signal is stacking on top of itself. You will get a small amount of feedback at the lowest volume and a large amount when the control is at full.Tweak: In shimmer mode, this control sets your reverb diffusion. Turn it clockwise to get a more diffuse reverb signal. Reverb mimics the size of a room, but diffusion mimics the walls of this room more specifically. Set this control to zero to approximate a rough or rocky wall sound.-1 Octave: This controls the level of signal automatically sounding one octave below the note you are playing. Set it to zero for no contribution from this octave generator; set to full for maximum sub-octave reverberation.+1 Octave: This controls the level of signal automatically sounding one octave above the note you are playing. Set it to zero for no contribution from this octave generator; set to full for maximum octave-up reverberation.Dry Signal: In reverse mode, this knob controls how much unprocessed instrument signal is routed to the top row reverb controls. At zero, only your octavized signal will send to the top reverb controls. At maximum, 100% of your dry signal goes to the top reverb controls alongside your dialed-in octavized setting.Wet Mix: This control mixes your ratio between how much dry signal and how much wet signal is in your output. Set to 12:00, you will get 50% dry and 50% Wet. Turn clockwise to get less dry and more wet, turn counter-clockwise to hear more of your instrument without the effected signal.
Other Key Features at a Glance - Footswitches
- Preset Footswitch: This changes between presets.Bypass Footswitch / Preset Save: Push down bypass to turn the pedal on and off. To save a preset, move the controls into the desired position. Hold down the Bypass button. Bypass button will blink and when the blinking ceases, your preset has been saved. There are 3 available presets, indicated by the blue, green, and red LED above the Preset footswitch. You can toggle between those presets by pressing the Preset footswitch.
- Expression Pedal Functionality
- Using a separately-available expression pedal allows you to roll in/out a single parameter or multiple parameters with your foot. To program the foot controller with the Descent, plug a foot controller into the expression pedal input. Set the expression pedal to toe down, and dial your desired Descent controls to the highest setting you'd like. Then put the expression pedal heel down and dial the controls to the lowest parameter you want. Move the expression pedal up and down to glide between the two settings.
- Stereo Functionality
- The Descent Reverb has stereo input functionality as well as stereo output possibilities. To use this capability, you'll need an existing stereo signal and a 1/4" TRS splitter cable. To activate the stereo input mode, remove the back-plate and locate the red DIP switches on the left-hand side of the circuitry. The Descent comes with the S2 switch up and the S1 switch down, enabling the mono-input mode. To switch the pedal to stereo input, you must toggle S1 to the up position and S2 to the down position. Once this is complete, replace the back-plate. Using the 1/4" TRS splitter cable, plug your two incoming stereo signals into the female ends of the splitter cable, and plug the TRS male end of the splitter cable into the input of the Descent.
UPC: 852732006047 In the Box WALRUS AUDIO Descent Reverb and Octave Machine Pedal Limited Lifetime Warranty Table of Contents
|
Upload User Manual
Have you got an user manual for the WALRUS AUDIO Descent Reverb and Octave Machine Pedal in electronic form? Please send it to us and help us expand our library of instruction manuals.
Thank you, too, on behalf of other users.
To upload the product manual, we first need to check and make sure you are not a robot. After that, your "Submit Link" or "Upload File" will appear.
Technical parametersWALRUS AUDIO 251350 Specs | I/O | 1 x 1/4" instrument input, phone type (stereo mode via DIP switch)
2 x 1/4" instrument outputs, phone type
1 x 1/4" TRS expression input, phone type
1 x 1/4" TRS remote input, phone type | | Controls | Dry mix knob
Reverb time knob
Diminish knob
Tweak knob
Wet mix knob
Dry signal knob
-1 knob
+2 knob
Mode toggle switch
Preset footswitch
Bypass/engage footswitch | | Power Requirements | 9 VDC, 140 mA minimum
The use of an isolated power supply is recommended for powering all Walrus Audio Pedals. Daisy chain power supplies are not recommended. | | Dimensions | 5.6 x 4.6 x 1.6" / 14.3 x 11.7 x 4.0 cm |
Rating60% users recommend this product to others. And what about you?

This product has already been rated by 29 owners. Add your rating and experience with the product.
Discussion
 Ask our technicians if you have a problem with your settings,
or if anything is unclear in the user manual you have downloaded.
You can make use of our moderated discussion.
The discussion is public and helps other users of our website who may be encountering similar problems.
The discussion is empty - enter the first post
Post a new topic / query / comment:
|
|
|
| Request for user manual |
You can’t find the operation manual you are looking for? Let us know and we will try to add the missing manual:
I’m looking for a manual / Request for manual
Current requests for instruction manuals:
I need a user manual and parts diagram for a Manfrotto Super Salon 280 Camera Stand - 9’
Thanks!...
OBIHI phone model number obi1032...
Instructions manual for a SONY woofer Model number: SA-W10...
I need the manual for a printer Brother MFC-J805DW. Reason is cause my printer is not recognizing the generic color cartridges LC3035...
I have a question, can you contact me at valenti-lanza@m.spheremail.net ? Cheers!...
|
| Discussion |
Latest contributions to the discussion:
Query
Name: Bruce Dunn
Avid Sibelius | Ultimate Standalone Perpetual
I seem to have lost the lower right hand icon that allows me to input notes, rests, voices etc. Can you tell me how to get it back?...
Difficult to remove the gooseneck mic. Help or advice needed.
Name: Joe Matos
Telex MCP90-18 - Panel Mount Gooseneck
Hi, I picked up an RTS KP-32 intercom and it has a gooseneck MCP90 mic installed, however I can't get it to come off. I read that it is reverse threaded 1/ 4" TRS, however when I tried by gripping it hard and turning clockwise, it still didn't come off. And turning counterc...
Question
Name: Dean Williams
Moultrie ATV Food Plot Spreader -
When spreading seed, does the gate automatically close when you turn the spreader off? Or do you have to close the gate via some other action?...
Video Promotion for your website?
Name: Joanna Riggs
Salamander Designs Keyboard Storage Shelf for
Hi,
I just visited search-manual.com and wondered if you'd ever thought about having an engaging video to explain or promote what you do?
Our prices start from just $195 USD.
Let me know if you're interested in seeing samples of our previous work.
Regards,
Joanna...
Need a REPAIR manual
Name: Dennis Behrends
Loctek Flexispot V9 Desk Exercise Bike
How do I get a REPAIR manual for a Loctek Flexispot V9 Desk Exercise Bike. I cannot get the petal crank off so I can remove the side panel. I have a crank removal tool but I'm afraid it will strip the threads because it is really stuck on there....
|
|

